Step-by-Step Guide: Setting Up a Web Server with Virtual Hosts on Ubuntu

I am a cloud enthusiast and a full time system administrator with passion for designing robust and efficient cloud architectures to empower businesses. As an AWS Certified Cloud Practitioner, I leverage my skills in Windows Server, DNS, Kubernetes, ECS, Route53, Docker, Ansible, KubeFlow, and Linux to create innovative solutions. I'm constantly expanding my knowledge, currently delving into MSSQL and Kubernetes, and staying updated on the latest cloud trends.
Ever wondered how a single server can host dozens of websites without breaking a sweat? The secret lies in Virtual Hosts – Apache's elegant solution for managing multiple domains on one machine.
In this hands-on guide, I'll walk you through setting up Apache Virtual Hosts on Ubuntu Server, from installation to deployment. By the end, you'll be hosting multiple websites like a pro!
Why Virtual Hosts Matter
Picture this: You have a powerful server with plenty of resources, but you're only using a fraction of its capacity. Virtual Hosts allow you to:
Host multiple websites on a single server
Maximize resource utilization instead of leaving cores idle
Organize projects efficiently with separate configurations
Save costs by consolidating infrastructure
Let's dive in and unlock your server's full potential.
Step 1: Installing Apache Web Server
First, we need a web server. Apache is battle-tested, free, and perfect for Ubuntu systems.
Update Your Package List
sudo apt update
For RedHat/CentOS users:
sudo yum update
Install Apache2
sudo apt install apache2

If you see the message above, Apache is already installed. That's perfectly fine!
Verify the Installation
Open your browser and navigate to your server's IP address or localhost. You should see the default Apache page:
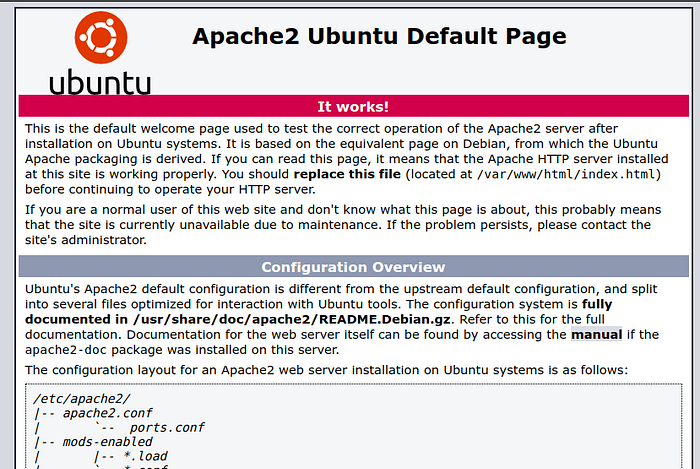
Pro Tip: The default Apache page is located at /var/www/html/. You can edit index.html in this directory to customize it.
Step 2: Creating Your Website Directory Structure
Now let's set up a proper directory for our new website. We'll use overflowbyte.tech as an example.
Create the Domain Directory
mkdir -p /var/www/overflowbyte.tech/public_html

Create a Simple HTML Page
Navigate to your new directory and create an index.html file:
cd /var/www/overflowbyte.tech/public_html
nano index.html
Add this HTML content:
<html>
<head>
  <title>Welcome to overflowbyte.tech</title>
</head>
<body>
  <h1>Success! 🎉</h1>
  <p>I'm running this website on an Ubuntu Server!</p>
</body>
</html>
Set Proper Permissions
Grant your user ownership of the directory:
sudo chown -R $USER:$USER /var/www/overflowbyte.tech/public_html
Set read permissions for the web server:
sudo chmod -R 755 /var/www
Why This Matters: Without proper permissions, Apache won't be able to serve your content, and you won't be able to modify files easily.
Step 3: Configuring Virtual Hosts
Here's where the magic happens! Virtual Host configuration files tell Apache how to handle requests for different domains.
Copy the Default Configuration
sudo cp /etc/apache2/sites-available/000-default.conf /etc/apache2/sites-available/overflowbyte.tech.conf
Important: Ubuntu requires virtual host files to end with .conf.
Edit Your Virtual Host File
cd /etc/apache2/sites-available/
nano overflowbyte.tech.conf
Here's what the default configuration looks like (with comments removed):
<VirtualHost *:80>
    ServerAdmin webmaster@localhost
    DocumentRoot /var/www/html
    ErrorLog ${APACHE_LOG_DIR}/error.log
    CustomLog ${APACHE_LOG_DIR}/access.log combined
</VirtualHost>
Customize Your Configuration
Replace it with this configuration:
<VirtualHost *:80>
    ServerAdmin admin@overflowbyte.tech
    ServerName overflowbyte.tech
    DocumentRoot /var/www/overflowbyte.tech/public_html

    ErrorLog ${APACHE_LOG_DIR}/error.log
    CustomLog ${APACHE_LOG_DIR}/access.log combined
</VirtualHost>
Key Directives Explained:
ServerAdmin: Your contact email for error notifications
ServerName: The domain name this virtual host handles
DocumentRoot: Path to your website's files
ErrorLog/CustomLog: Logging configuration for debugging
Step 4: Enabling Your Virtual Host
Now let's activate your new virtual host configuration.
Enable the New Site
sudo a2ensite overflowbyte.tech.conf

Disable the Default Site
To avoid conflicts, disable Apache's default configuration:
sudo a2dissite 000-default.conf
Reload Apache
Apply your changes by reloading Apache:
sudo systemctl reload apache2

Step 5: Testing Your Virtual Host
Add a Host Entry (For Local Testing)
Since we're testing locally, add this entry to your /etc/hosts file:
127.0.0.1 overflowbyte.tech
On Windows, edit: C:\Windows\System32\drivers\etc\hosts
Browse Your Website
Open your browser and navigate to http://overflowbyte.tech

🎉 Congratulations! Your virtual host is live and serving content.
Pro Tips for Production
1. Point Your Domain to Your Server
Update your domain's DNS records to point to your server's public IP address.
2. Enable SSL with Let's Encrypt
sudo apt install certbot python3-certbot-apache
sudo certbot --apache -d overflowbyte.tech
3. Create Multiple Virtual Hosts
Repeat the process for each domain you want to host. Each gets its own .conf file!
4. Monitor Your Logs
Check logs regularly for issues:
tail -f /var/log/apache2/error.log
Troubleshooting Common Issues
Problem: Browser shows "Connection Refused"
Solution: Check if Apache is running: sudo systemctl status apache2
Problem: Shows default Apache page instead of your site
Solution: Verify your virtual host is enabled: sudo a2ensite overflowbyte.tech.conf
Problem: 403 Forbidden Error
Solution: Check directory permissions: sudo chmod -R 755 /var/www/overflowbyte.tech
Wrapping Up
You've just learned how to:
Install and configure Apache on Ubuntu
Create organized directory structures for multiple websites
Set up virtual hosts to manage different domains
Enable and test your configurations
Virtual Hosts are the backbone of efficient web hosting. Master this skill, and you'll be able to manage entire web ecosystems from a single server.
Need Help with Your Server Setup?
Setting up production-ready web infrastructure can be complex. If you need professional assistance with:
Server deployment and configuration
WordPress or application hosting
SSL certificate setup
Performance optimization
Migration from other providers
I'm here to help! Reach out to me at overflowbyte.tech@yahoo.com or visit my portfolio at pushpendra.overflowbyte.cloud
With experience in server administration and cloud infrastructure, I specialize in building reliable, scalable hosting solutions for businesses.
📖 Read the original article: Mastering Multiple Domains on Medium
💼 Connect with me:
LinkedIn | GitHub | Email
Happy hosting! 🚀